- Drivers Technotrend Network & Wireless Cards Free
- Drivers Technotrend Network & Wireless Cards Software
- Drivers Technotrend Network & Wireless Cards Download
- Drivers Technotrend Network & Wireless Cards 2020
On this page ..
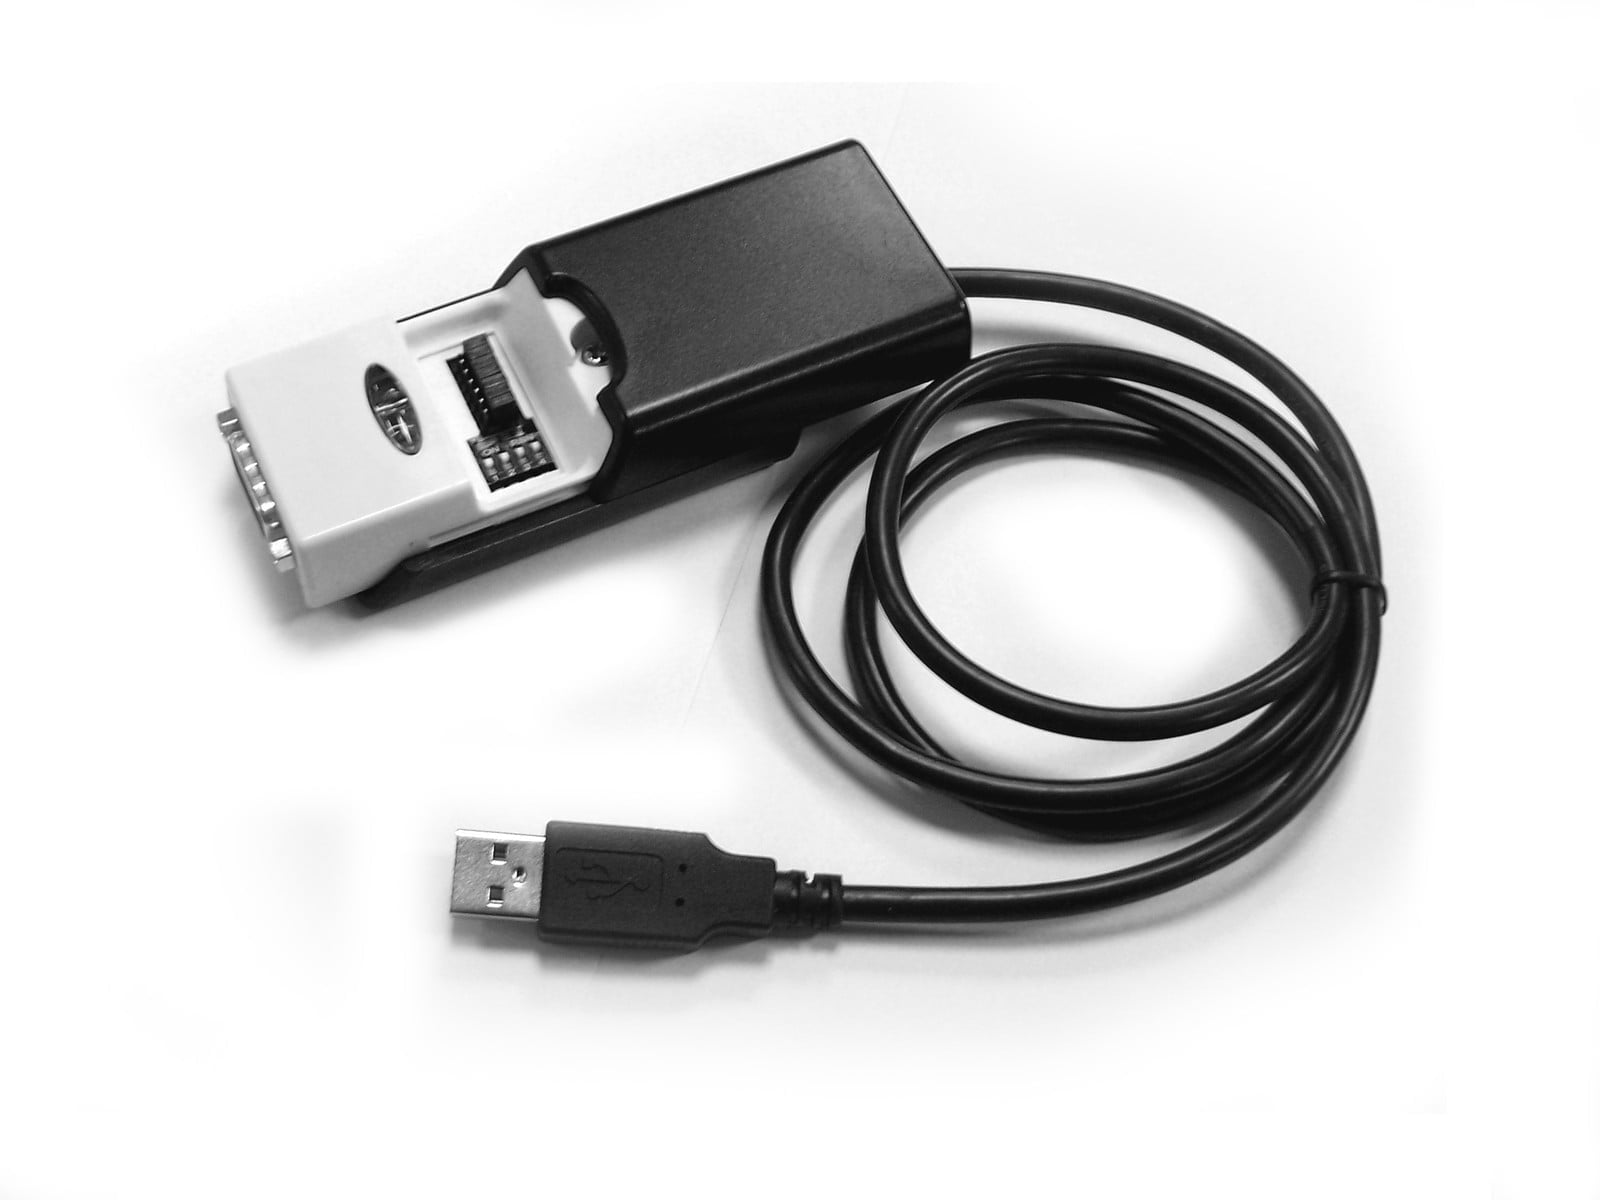
Installation of the TechnoTrend/Hauppauge DVB card Here I'll explain how to install the TechnoTrend/Hauppauge DVB card (a PCI card for both DVB data and DVB Television reception by satellite) for use with Europe Online (EON) and for watching satellite TV programs. Most Internet by satellite providers use a similar setting. Note: Due to the very bad performance of EON these pages are no longer updated. The forum however remains. |
ASUS is one of Fortune magazine’s World’s Most Admired Companies, and is dedicated to creating products for today and tomorrow’s smart life. Our comprehensive portfolio includes Zenbo, ZenFone, ZenBook and a range of IT devices and components, along with AR, VR and IoT. ASUS employs more than 17,000 people worldwide and over 5,500 world-class R&D talents. Download Wi-Fi device drivers or install DriverPack Solution software for driver scan and update. Download Download DriverPack Online. Wi-Fi device drivers. Fibocom Wireless Inc. Guillemot Corporation. Video cards sound cards. Recommended Wireless & Network Drivers Updates Wireless Networks and Wireless Network Adapters will not work without the correct and up-to-date Wireless Drivers IMPORTANT NOTICE: Downloading the latest Driver releases helps resolve Read more.
Overview
Introduction
This guide is good to start working with the combination of Europe Online and the Technotrend and look-a-like boards, like Siemens, Galaxis, TechnoTrend and Hauppauge DVB-s & Nexus, even in combination with SuperWeb ! The big downside of these cards, with the exception of Galaxis and Siemens, is that you should not count on any proper support from their helpdesk.
The same card over and over: TechnoTrend
The now following text is based on my own experiences and the experiences of others. I can't guarantee that this is the best, fool proof method of installing. By my knowledge however, this is a very easy and good working method.
Note: the entire setup is spread over several pages. This will increase the download speed for the page.
TechnoTrend WinTV DVB-s Setup
Requirements:
- Install the dialup adapter - your PC must have an Internet-connection that is already operational.
- DVB-card CDRom or disks (download the most recent drivers can be found on the drivers page)
- Windows 95 or 98 setup CDRom - the one you used to setup your PC
- Dish for satellite reception, mounted and an antenna-cable to your computer
In the text below I will refer to Hauppauge for drivers and software. For the Hauppauge look-a-likes similar software is available (all of them done by TechnoTrend) only the names are changed to for example TechnoTrend, Galaxis, etc.
Short briefing for the impatient & Step by Step guide
The tabel below you can be used in two ways:
1. For the impatient (like me)
It's a short an quick briefing on how to install. Only experienced users should use this.
2. For the less experienced
Each step is a link to a page where the steps are explained in detail, including snapshots and photographs.
| Activity | |
| Shutdown computer and open case | |
| Look for an empty PCI slot | |
| Connect internal Audio | |
| Insert DVB card in to PCI slot | |
| Connect antenna-cable from dish | |
| Close PC case | |
| Boot computer | |
| Install driver | |
| Install software | |
| Check network-settings | |
| Setup DVB Data Services for proper transponders | |
| Setup Internet Explorer proxy-servers | |
| Setup TV/Teletext software |
STEP 1 | Shutdown your computer and open the case so you can access the mainboard. |
Shutdown your computer, if you have not done so yet. Remove the power-cord. Remove the screw and finally remove the 'hood' of the PC-case.
!!! DO NOT SWITCH YOUR COMPUTER ON UNTIL STEP 7 !!!
STEP 2 |
This is not to hard to find since most manufacturers use these color codes to identifcy the slots:
Color | Slot-type |
| ISA (antique 8 or 16bits slot) | |
White | PCI (required for DVB) |
| AGP (videocard) or AMR (smaller, Audio or Modem card) |
STEP 3 | If needed, you can now connect the internal Audio connections. |
INTERNAL AUDIO
Your DVB card has 2 connectors for the internal audio connection.
One of these (A - see image at Step 5) is connected to your souncard, the other connector (B - see image at Step 5) can be connectied - optionally - to your CDRom-player's audio output. This last option can be helpfull if you don't have enough connectors free on your Audio card.
EXTERNAL AUDIO
Alternatively, you can connect audio using the external Audio output of your DVB card. In the picture below marked as connector C (see image at Step 5).
STEP 4 | Insert the DVB card into the empty PCI slot and locked it. |
Check, just to be sure, that the card is inserted correctly and not like often happens slightly tilted or not pressed far enough into the slot (the golden contacts on the bottom of the card, should not be visible).
Note: your PC is still NOT switched on !
STEP 5 | Connect the antenna-cable of the dish gently to the DVB-card. |
The centre pin of the connector used is simply the same wire used inside the antenna-cable and therefor not very strong. Be gentle!
Use connector marked F in the picture below to connect your antenna to. The connector marked E can be used to connect additional satellite receivers (for example an other computer or a normal TV/Sat-receiver).
Once again: NOTE THAT YOUR COMPUTER SHOULD NOT BE SWITHED ON!
What ever you do: ALWAYS make sure your computer is switched OFF when connecting or disconnecting the antenna cable !
|
STEP 6 |
Do not power your computer yet !
After you closed the PC, place the screws back and finally reconnect the power-cord but do not boot your computer yet !
STEP 7 | Reboot your computer. |
After connecting all cables (including the powercord) you can switch your computer on so it will boot.
STEP 8 |
As soon as Windows (Windows 95, 98, 98SE, ME, 2000) starts, it will come up with a notification that it found a PCI device (the DVB-card). The next pictures illustrate this, using Windows 98 SE (Second Edition). Other Windows version will show similar dialogs with the exception of Windows NT.
Select 'Next'.
In the new dialog, check 'Search for the best driver for you device' and select 'Next'.
A new dialog opens. Insert the Hauppauge installation CDRom in the CDRom-drive.
Check 'Specify a location' and select 'Browse..'. Now start looking for the location of the drivers. The standard CDRom that came with the DVB-card, will show the driver in the directory CDROM:Driver7146 (ofcourse you will need to replace CDROM with the drive-letter of your CDRom-drive). You can also try to download a new driver version, see DVB-Drivers for details where to get these.
Note: Windows 2000 and Windows XP user!!! You will NEED driver version 2.08 or newer !!!
Select 'OK' followed by 'Next'. Windows will display a message that it found your DVB card.
Select 'Next'.
This last dialog indicates that Windows finished the installation of the driver. Select 'Finish' to complete.
Installation of the driver can be checked by clicking with the right mouse button on 'My Computer' and selecting 'Properties'. Select the tab 'Device Manager' and open the group 'Sound, video and game controllers'. There you will find the DVB card, the name is depending on the driver you installed, for example the Hauppauge drivers will indicate a 'Hauppauge WinTV DVB-s'.
STEP 9 | Software installation. |
Start 'SETUP.EXE' or 'SETUP' of the Hauppauge/Technotrend CDRom. There are 2 ways of doing this:
1. double click 'My Computer'.
Next double click the CDRom icon. Depending on the version of the CDRom the setup might autorun. If not, double click on the 'SETUP.EXE' icon.
If Windows doesn't find a new driver, you can try looking for one on the device manufacturer's website and follow their instructions. Reinstall the device driver. In the search box on the taskbar, enter device manager, then select Device Manager. Right-click (or press and hold) the name of the device, and select Uninstall. Restart your PC. Toshiba laptop and netbook drivers. Install drivers automatically. Are you tired of looking for drivers? DriverPack will automatically select and install the required drivers. Popular Toshiba laptops and netbooks. Tips for better search results. Ensure correct spelling and spacing - Examples: 'paper jam' Use product model name: - Examples: laserjet pro p1102, DeskJet 2130 For HP products a product number. Examples: LG534UA For Samsung Print products, enter the M/C. Find HP laptop and desktop support and customer service options including driver downloads, diagnostic tools, warranty check and troubleshooting info. Customer Satisfaction Is A Priority For Toshiba. Toshiba offers a very wide range of products in diverse industries in the United States. For each of our businesses, we consider customer support, satisfaction and feedback an essential element of our overall marketing effort. 
2. click the 'Start' button of Windows, select 'Run..' and type the drive-letter of the CDRom-drive followed by ':SETUP.EXE'. For example D:SETUP.EXE if D is the drive-letter of your CDRom-drive.
A dialog appears, select 'Next'.
In this new dialog, if you want to install the software on a different location, then do this now by selecting 'Browse'. This is not required but some people like to keep things neat and clean..
Select 'Next'.
The installation of the software will now be completed. When setup is finished copying files a dialog will appear in order to complete the network settings (not in Windows XP and Windows 2000). Automatically, while being at 'network-installation', another dialog appears (Adapter Properties). Select 'OK' - the virtual network driver is installed now - followed by 'Exit and Restart'. Windows will now reboot (not WinXP and 2K).
STEP 10 |
Finally, after Windows finished rebooting, we can check the network settings of the DVB card. This is done by clicking 'Network Neighbourhood' with the right mousebutton, and selecting 'Properties'.
A 'Network' dialog appears, where we see the 'Virtual DVB/IP Network Adapter'.
Just beneath the Virtual Network Adapter we see the protocol used by the DVB-card: 'TCP/IP -> Virtual DVB/IP Network Adapter' - double click this, so we can verify the IP-Address used.
This is the way it should be: IP-address = 192.168.2.239. If this is correct, select 'Cancel' twice. Network properties will now be closed.
Just in case the IP-address is not correct, you can correct this.
Note that in private networks, the IP-address might be in the same ip-range as the normal network. Make sure the network ip-range and subnet mask are not th same.
Remember the IP-address, as we might need it later on !

STEP 11 | Setup DVB Data Services. |
REGISTRY TRICK
In this particular step we will setup the transponders so we can actually receive data from the satellite. To make life a bit easier, I copied my registry settings so you can download these here. Settings for all transponders are included (103, 113, 114 and 115). After downloading, you will need to unzip the file using for example WinZip. Double click the unzipped file (make sure 'DBV Data Services' is not running) and the information will be added to your registry.
Note: this is a copy of the settings for the driver version 1.22.
I don't know if they will work with other versions of the drivers ! If it worked can be cheked by looking at the 'Service Selection' in the 'DBV Data Services' application. Finding 'EOL No103' there will be a good sign.
In case this worked just fin, I just saved you this:
MANUAL
Start the program 'DVB Data Services' by selecting 'Start' - 'Hauppauge WinTV DVB-s' - 'DVB Data Services'. If the text appears in a different language, then use the little flag in the lower left corner to switch language.
Note the icons in the Systray (in the lower right corener of your monitor, displaying the Windows time as well):
- DVBPCI (the DVB server for DVB Data)
- Green or red smiley (the DVB Data Services)
Now select the tab 'State / Tuner' where you can select 'New' to add a transponder.
Here you will have to enter 'Frequency', 'Symbol rate' and 'Polarization' as shown on the transponder page. As an example we will setup transponder 113.
Frequency: 12633250
Symbolrate: 220000000
Polarization: H (Horizontal)
Select 'Apply' and the indicators ('Signal quality' and 'Signal level') will show a value now.
The exact values aren't that important. The indicator in the SysTray will either display a green (dark or ligh) smiley if reception is OK. A red smiley indicates NO RECEPTION which can be caused by a typo or a badly adjust dish.
Select the 'Filter'-tab and add, in a similar fashion, the filters as shown on the transponder page.
The Radius login, used by Europe Online, requires one additional setting: at the tab 'Filter Options' you must check the 'Calculate MAC address from the IP address of the dialup connection'.
The IP-address (0.0.0.0) is not very important, the application will changes this if needed.
Repeat this entire 'step' to setup all required transponders. When done, select 'Hide'.
Note: 'DVB Data Services' will always be required when internetting!
STEP 12 |
So, now we're almost ready for our first INTERNET Test-drive, but first we need to do the proper settings for the Internet Explorer.
Note: similar settings are required for Netscape, Opera, etc. NetCaptor however uses the Internet Explorer settings.
With the right mouse button click on the blue 'e' found on your desktop. Select 'Properties' from the popup menu as shown below. Select the tab 'Connections'.
In the pictures above this text you will notice that I have 3 dialup-adapters in use. Take a look at the Dialup-page for more information and tips. I use 3 dialup-adapters so switching between transponders is easier.
Select the dialup-adapter you want to use for Internet by Satellite and select 'Settings'.
Make sure 'Use a proxy server' is checked.
Enter the proxy server's IP-address at the 'Address' field. This should be the proxy that goes with the transponder you would like to use (take a look at the transponder page). For the transponder 113 the (new!) IP-address should be 194.177.32.11 (in picture above the old ip-address is mentioned).
Next step is to enter the proper 'Port' number (8080). Here you can also enter the username and password for the dialup adpater at the fields 'User name' and 'Password'.
Note: This is not the same password as the one you use for the login at Europe Online !
Select 'OK' and repeat these steps for each individual Dialup-adapter. If you experience problems mind you to change the same settings for 'LAN Settings' as well.
When finished, close the window by selecting 'OK'.
Starting your first session
- Start DVB Data Services
- Start the dialup adapter you wish to use for the Internet Service Provider.
That's it ! Now you can surf by Satellite ..
Setup of the TV and Teletext application
On this page I will briefly describe how to get all the Radio and TV stations up and running for the DVB TV&Radio application without to much effort.
Thank God this a relatively easy. You could have the program to search for the Radio and TV stations but there is an easier way to do this. I made my settings available for download so just about anybody can use it.
The Astra settings can be download at either TechnoTrend or Hauppauge - See DVB Drivers for details.
Click on the Windows 'START' button. Select 'PROGRAMS' - 'HAUPPAUGE WINTV DVB-s' - 'DVB TV & Radio'. In the newer release (ie. 1.22) only the options 'DVB Data Services' (for surfing the Internet) and 'DVB TV & Radio' remain.

In the 'DVB TV & Radio' application, click on the silver colored binder to select the Astra settings file. The key combination CTRL+O will do the same job.
If you downloaded the Astra aettings, you can now select the unzipped TPR-file and select 'Open'. All Radio and TV settings are now done.
2 remarks:
- Not all stations will have image, for most of these channels you will have to get an subscription, like Canal+.
- Yep, there is a software descramble (CI/CAM) called MultiDec available that descrambles Pay-TV.
Background

For some time, people wanting to receive EUMETCastbroadcasts of weather satellite data have wanted a USB box capable of operationat better than USB 1.1/2.0 rates. For the Metop data which has beenavailable for the last year, USB 2.0 hi-speed is the minimum required to get allthe data. There is also a trend away from the DVB PCI cards such as theSkyStar 2 which, although they perform very well and can handle all theavailable data, do require people to open their PC to install them, whereas USBis a simple connector which requires no case opening. Finally, any PCbought today will, by default, be supplied with a version of the Windows-7 orWindows-8 operating system, so obtaining correct operation under that OS is a must. These notes were first written for Windows Vista, but apply to Windows-7 andWindows-8/8.1 as well.
I have divided this information into a number of topics to tryand keep the information on each page down to a reasonable level.
- First, we look at the hardware, and what you get in the box. The DVBWorld box from the GEO Shop functions in just the same way.
- Next comes the all-important software installation, which I have again split into sections.
- The Dexatek software, which comprises the drivers for the USB box - these are the basic hardware interface and are installed together with the Dexatek control and TV viewing program - and the Dexatek control and TV Viewing program, which can also deliver DVB packets to other software.
- The TelliCast software which turns the DVB packets into files for further processing, e.g. by my AVHRR Manager, MSG Data Manager and Metop Manager software.
- The eToken (EKU) software which allows the TelliCast software to access the eToken and confirm which data you are allowed to receive.
- A RAMdisk to improve the performance of the TelliCast software.
- Finally, there are some notes on this page about using EUMETCast with Windows Vista & Windows-7.
Please note that this particular USB box is not endorsed by EUMETSAT. However, it does appearto do the job! You can now get an equivalent DVBWorld box at a greatprice from the GEO Shop, andthe instruction here are very close to the guide which GEO supply.
Note: if you already have a SkyStar PCI cardinstalled, be sure to remove it and any drivers before installing a USBDVB receiver.
Other hardware which works on Windows Vista or Windows-7/8
- Skystar2 PCI card, using the (hardware from the GEO Shop). [from: Arne van Belle, 2007 Dec 24]
- Keith Lawton confirms the SkyStar2 PCI installation is OK providing the latest available TechniSat drivers and EUMETSAT supplied TelliCast and eToken software is used. He notes notes the possible need to remove B2C2 registry entries if a SkyStar installation does not complete properly. [2008 Jan 06]
- TechnoTrend S2400 USB box, using the latest available drivers. The TechnoTrend has a data application and TV application, both use the same driver but without installing the data application you don't have the virtual network adapter. [from: Arne van Belle, 2007 Dec 24]
- The DVBWorld DVB-S USB2102 and DVB-S2 USB2104 USB boxes using the latest downloaded drivers. The S2 version also does HD-TV (but possibly not at the same time as EUMETCast). [from: Arne van Belle, 2008 Jan 06]
Mark Drapes has kindly provided his step-by-stepguide (in Excel format) to installing the SkyStar PCI hardware and the othercomponents of a EUMETCast system under Windows-7. Many thanks, Mark. Please address any queries directly to Mark.
Different boxes and whatchipsets do they contain?
In response to questions about different boxes and whatchipsets they contain, Arne van Belle comments in February 2008..
- Be careful with the SkyStar USB 2. This new box is not available yet and I have not seen drivers for it. Not all TechniSat products use the FlexCop chipset.
- 'SkyStar USB' uses FlexCop but has USB1.1, this box cannot handle MSG + MetOp simultaneously. This USB bus handles only up to 6 Mb/s.
- 'SkyStar USB Plus' is USB2.0 but is a re-badged TechnoTrend connect S2400 (does not use FlexCop) and is not sold any more.
- 'SkyStar 2 PCI' is a 5V only PCI card (versions 2.3 up to 2.6), a new 3.3V and 5V PCI compatible V2.7 is announced. All use the FlexCop but 3 different tuners are used.
- 'SkyStar HD' is 3.3V and 5V PCI compatible but this is a re-badged TechnoTrend Budget S3200, no FlexCop and different drivers.
- I have not seen PCIe receivers yet - professionals use DVB-S routers like the IPricotIPr-S500.
- The DVBWorld 2102 (and OEM versions like Dexatek DK5702 and Acorp DS120) we tested does not use FlexCop chipset. PID filtering is done by the driver. Linux details can be found at http://www.worlddvb.com/html/Linux%20driver%20link.htm
Hardware Installation
- First, install the hardware
Software Installation

There are a number of components to the software.
- Install and configure the Dexatek software, and network address
| Please note that every time you start the Dexateksoftware you must press the IP button to start the IP service and henceallow TelliCast to work. That's the one circled here. It would be great if the program accepted acommand-line parameter to do this automatically, but instead you can use this program. |
Drivers Technotrend Network & Wireless Cards Free
Windows Vista - red or yellow TelliCast icon resolved!
If at this point, everything works apart from when your localnetwork is connected, and you have lots of yellow ,or intermittent pink and red T-icons, please see this note about adding a routefor the DVB network.
System 1 - Dexatek USB box
Performance over the 42 hours from 14:45, 2007 Nov 29 to08:45, 2007 Dec 01.
Configuration:
- AMD Athlon 64 X2 dual-core 4400+ 2.21GHz
- 3GB physical memory
- ASUS A8N-SLI motherboard (not suitable for SkyStar2 PCI card)
- Windows Vista Ultimate
- RAMdisk - AR Soft RAMdisk set to 80MB
PIDs taken:
- all advertised EUMETCast PIDs
Data taken:
- MSG-2 HRIT etc. full-time
- EARS-AVHRR (from 10:00, Nov 30)
- EPS Metop-AVHRR and NOAA-GAC (from 07:00, Nov 30)
Simultaneous processing:
- MSG Data Manager, AVHRR Manager, Metop Manager to save data
- no GeoSatSignal, HRPT Reader or MSG Animations tested
- other software was running, SBS-1 BaseStation, GAS SBS-1 Populate, COAA's Plane Plotter, MST defrag
- I have not turned off either System Restore, nor Windows indexing
- There is no anti-virus software running on that PC
- The Windows firewall and User Authorisation Control (UAC) were enabled
FSY file size has risen to 67,836KB
Lost data:
It seems that when I was setting up the Metop Manager, I mighthave caused some data loss early on November 30.
Drivers Technotrend Network & Wireless Cards Software
MSG-2 Missing HRIT & LRIT segments report:
Date: 2007-Nov-29
Cycle: 1730 HRIT channel 06, segment: 5
Date: 2007-Nov-30
Cycle: 0600 HRIT channel 12, segment: 3
Cycle: 0815 HRIT channel 06, segment: 4
Cycle: 0900 HRIT channel 08, segment: 3
Cycle: 1600 HRIT channel 02, segment: 6
Metop: one missing chunk:
Date: 2007-Nov-30, day 334, 0640
System 2 - SkyStar2 PCI DVB card
Drivers Technotrend Network & Wireless Cards Download
Arne van Belle reports that an essentially losslessperformance was obtained with the SkyStar2 PCI card running both reception andprocessing under Windows Vista Business edition. This was receiving andprocessing the same data as the above system, and was connected to the LAN atthe same time.
Power Plans
By default, Vista is set to the 'Balanced' power plan, which switches the computer off after one hour. I changed to the 'High Performance' plan, and checked that both the hard disks and the computer remain 'on'. The default 'Balanced' plan does not suit 24-hour operation!
Directory
I recommend that the first thing you do on Vista is to createa directory C:Tools and ensure that it has completely open protection (everyone:full-access). Use C:Tools instead of C:Program Files for installationof software which may use .INI files or otherwise not quite Vistacompatible. The same applies to Windows-7.
Drivers Technotrend Network & Wireless Cards 2020
Memory
Windows Vista & Windows-7 will make more use of the physical memory yougive it, in particular for caching disk data. If you run the Task Manageryou may get a result similar to that below, which is for a 3GB system:
At first, you might be rather worried to see that only 12MB ofmemory is free - I was - but then you notice that only 46% of the physicalmemory is actually used, which corresponds to the 1.37GB in the Memorygraph. Nearly 2GB is devoted to caching. This system was alsorunning the SBS Virtual Radar (BaseStation, PlanePlotter and SBS-1 Populatesoftware) which accounts for most of the 25% continuous background load you cansee.
FAQs
- Which version of Windows should I choose? So far, tests with the Home Premium, Business, and Ultimate editions have been successful. I expect the edition does not make a difference to the ability to work with EUMETCast.
- Do I need the new Aero graphics mode? Not to run EUMETCast.
- What memory should I have? For systems which both receive and process, I would recommend 2 - 3GB of RAM. More than ~3GB of RAM may not be accessible to 32-bit Windows. If you can fit 4 - 6GB of RAM and run 64-bit Windows, so much the better.
- Should I get the 64-bit or the 32-bit version? Most of my tests have been with the 32-bit version. People have reported that the 64-bit version works, and I have used the DVBWorld 64-bit software with the Dexatek hardware successfully, including the TelliCast software and V4.5 64-bit eToken drivers. The version I used of Dexatek's own software would not run in 64-bit Vista. With 4GB or more memory, each 32-bit process can get nearer to its maximum 2GB physical memory, which can improve performance for some memory-intensive operations, and is likely be the way of the near future.
My thanks to David Simmons for pointing out the existence ofthe Dexatek box in the first place, and his demonstrations and explanationsduring the weekend of the GEO Management Team meeting (2007 November 16-18), toIan and Douglas Deans for their testing of Vista and my own software in theearly days, to Arne van Belle for research into the problems and pointing outtools like the Vista Resource Monitor, to John Tellick from GEO for hisencouragement throughout, and to Klaus-Peter Renner at EUMETSAT for his insightinto the TelliCast system. I feel getting this working has been a realteam effort.